發表文章

目前顯示的是 2022的文章

飛利浦 自動咖啡機 does not comes out enough cafe...

圖片
 purchased in costco, it's modeled as EP2231 then model name is a special one, you can only find latteGo 2200 on open market. it works like a charm, but soon you will need to replace filter, and clear the brew group. Still after few months of usage, one day the espresso only comes 10 cc or even less some times. googling, there are few things to be clear and replace: 1. the filter can be unmounted and clear the inside, mine has a lot of cafe... 2. the oring...not only one.... Here is the video shows how to unmount it and clean it. But after doing all the cleaning stuff, cafe still does not come out with good quantity. There is another thing, O rings... this is how the brewer works, grinder grind the coffee, then send into the chamber, by very good mechincal design, they are pushed into an other position where brewer host up hot water and close the cafe chamber. If the O rings of this 2 parts is getting aged, the seal will not be completed, then hot water leak out and you get no espr
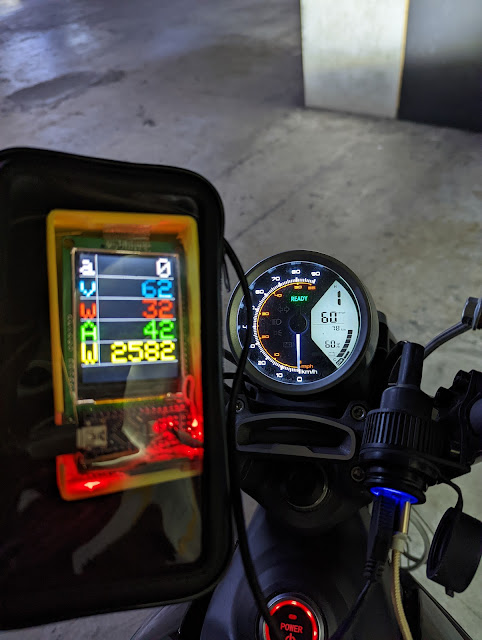
Soco TC performance test 20220322

圖片
 I have made a watt meter with ASC758, I test my TC with original battery(60V 30AH) and original speed controller. The result is that no matter I ran on a flat or a up hill(gear 1 or 3 does not matter), the current is controlled at 40A...with 60V it gives 2400W, when battery is fresh, the watt could be higher with higher voltage. and when going up hill, the voltage will drop to 58V, so the power will drop as well as speed. I believe the current limit comes from the speed controller. since BMS would not have the ability to control current at this precision. To increase the power, few ideals: 1. increase the voltage according to this video on utube:  https://youtu.be/0xSuIvrNwVs  the original controller seems also have a over voltage protection at 75 volts , once over voltaged controller will not drive the wheel, and you need to go down to 72V for the controller to drive the wheel. original battery 17S is charged at 71V= 17S*4.17V if we charged at 4.1V/cell, with 75V limit, we can do 18S

few features I wish to add on a pi base Lora gateway

圖片
  There are loraWan gateway based on Pi and RAK lora concentrator. adding a IIC oled display and a shut down button is nice(maybe an addition LED to indicate it's shut down already) My first lorawan gateway is like this one, it has been running for a while with out problem, 1.5 years later, my pi start to hang....maybe due to heat... My second one is with 2245, and pi zero, since the pi zero W, the whole system takes about 225-250mA at 5V side, and the temp is low... 1. Adding power button https://www.youtube.com/watch?v=qAzheiZlB9k&t=344s&ab_channel=AndreasSpiess sudo nano /boot/config.txt and add the following line to the file: dtoverlay=gpio-shutdown,gpio_pin=3,active_low=1,gpio_pull=up ctrl-X and Yes and, after a reboot, it should work. No, Andreas' trick does not work on rak gateway... But this does work on 2021-10-30 raspios bull eye.... I made it on gpio26, since I want to use GPIO3 as IIC for OLED This one use a py service, and it works on the rakgateway. http:/

BLDC gimbal and FOC controller

圖片
 I have had few boards for BLDC gimbal on hand. As time goes by, I don't really remember what version they are. board1: Martinez V3 http://itsqv.com/QVM/index.php?title=How_To_-_Martinez_Brushless_Gimbal_Controller_Set-Up#Board_Identification There are dicussion on RC group: https://www.rcgroups.com/forums/showthread.php?1901828-Martinez-board-Open-source-brushless-gimbal-HELP-THREAD And the document is store here: https://code.google.com/archive/p/brushless-gimbal/downloads and migrated to :  https://sourceforge.net/projects/brushless-gimbal-brugi check out the schematic This board has a 4A on board SMD fuse, and 2 L6234, 3 half bridges, peak 5A Both T1 and T2 are always enabled(enable pins are tied to 5V) T1_in_1 connect to PWM1(digital3 of 328p) T1_in_2 connect to PWM2(digital5 of 328p) T1_in_3 connect to PWM3(digital6 of 328p) T2_in_1 connect to PWM4(digita9 of 328p) T2_in_2 connect to PWM5(digital10 of 328p) T2_in_3 connect to PWM6(digital11 of 328p) on T1, the motor wire are

Simple FOC for esp32 in arduino with 東哥

圖片
 Here is the thing I purchased in Taobao it's a modified version of simple FOC with esp32,It comes with info on git: https://github.com/ToanTech/Deng-s-foc-controller and a chinese colone of git:  https://gitee.com/ream_d/Deng-s-foc-controller the programing is based on: Arduino IDE 1.8.13 SimpleFOC Library 2.1.1 ESP32 Arduino Libiary 1.0.4   Dong also provide a zip file for the set: https://github.com/ToanTech/Deng-s-foc-controller/tree/master/Arduino%20IDE%20for%20Deng%20FOC but I think it's better to install yourself. Dong also provided schematic, but in Json format, it's a format supported by easyEDA The schematic: U2 is a esp32:  ESP32开发板 lolin32 lite base on the schematic IIC pins for encoder: SCL0:18 SDA_0: 19                                            SCL1:5   SDA_1: 23 Pins for motor drive L6234: motor0: M0_EN        :22      M0_IN1       :32 M0_IN2       :33 M0_IN3       :25 motor1: M1_EN       :12 M1_IN1      :26 M1_IN2      :27 M1_IN3      :14 pins for current s

Adding hall sensor on RC sensorless BLDC motor

圖片
From a ebike forum: This one adding hall sensors to outrunner Turnigy C8085-170 from out side. https://endless-sphere.com/forums/viewtopic.php?f=30&t=15686 But for big motors, put sensor inside is better. placing hall sensors between slots: https://endless-sphere.com/forums/viewtopic.php?f=28&t=12768&start=60#p225084 calculation http://mitrocketscience.blogspot.com/2011/08/hall-effect-sensor-placement-for.html Legend: edeg : electrical degrees erot: electrical rotation. 1 erot = 360 edeg mdeg : mechanical degrees mrot: mechanical rotation. 1 mrot = 360 mdeg pp : number of magnet pole  pairs .  1 pp = 2 magnets (1 north, 1 south)  s : number of slots (in the stator) Equation 1:       (360 mdeg /  pp ) =  n  mdeg per erot = n  mdeg per 360 edeg  a motor controller that requires  120  edeg  hall effect sensor placement . You need to find the number of mdeg per 120 edeg. So you just divide the above equation by 3. equation 2:     (360 mdeg / 3* pp ) =  m  mdeg per 120 edeg. For